
Giant animal lanterns are made by turning an approved visual concept into a full-scale illuminated form. The process normally moves through concept confirmation, proportion and pose review, full-size layout, frame shaping, lighting placement, surface and color work, pre-assembly, labeling, and packing. For a buyer, the most important point is not memorizing workshop steps. It is knowing what must be approved before each step makes later changes more difficult.
A lion, elephant, tiger, bird, or fantasy creature may begin as a photograph, a sketch, a brand character, or a broad theme. Before fabrication starts, that reference needs to become one controlled design direction with a defined viewing angle, relative scale, posture, expression, color palette, quantity, and relationship to the surrounding scene.
In many ParkLightShow inquiries, the buyer does not arrive with a finished animal design. The initial input may be a site plan, a general venue type such as a zoo, botanical setting, or public park, and a request to create a lantern display. ParkLightShow then develops a visual proposal and effect renderings for project review. This matters because the manufacturer is not merely enlarging a catalogue animal; it is translating limited site and theme information into a scene the buyer can evaluate before production.
One past park project in Spain included butterfly forms and other animal lanterns. The customer, exact venue, city, date, quantities, and project results are not disclosed here. The example is relevant because it shows how a broad park setting can become a mixed animal visual program without requiring the buyer to arrive with every individual form already designed.

The Work Starts Before the Factory Floor
The first production decision is not the metal frame. It is the visual brief.
A useful brief explains where the animal will appear, what role it plays, and how it should be seen. A single landmark near an entrance needs a different composition from a family group along a trail. A photo feature may need a strong front view, while a figure seen from a moving route may need a clear side silhouette. A realistic zoo-themed animal, a friendly character, and a fantasy creature also require different proportions and surface treatments.
Reference images help, but they should not be treated as an instruction to copy another artist or copyrighted character. The buyer should identify what matters in each reference: posture, expression, color mood, body proportion, or scene relationship. The design can then develop an original direction around the project rather than combining unrelated details from several pictures.
Before the approved image becomes a production reference, the buyer should confirm:
- the animal or character category;
- intended display function and main viewing side;
- approximate available height, width, and depth;
- realistic, stylized, friendly, or fantasy-led treatment;
- standing, walking, sitting, flying, swimming, or another pose;
- preferred colors and any brand or event palette;
- one figure, a repeated group, or a mixed scene;
- surrounding plants, terrain forms, or companion animals;
- known delivery, handling, and local assembly constraints that may affect section planning.
These are creative and project inputs, not universal engineering specifications. Project-specific structural, electrical, site, and safety decisions require the appropriate qualified parties.
Seven Stages in the Animal Lantern Manufacturing Process
1. Concept and Reference Confirmation
The starting idea is organized into a visual brief. The supplier and buyer identify the subject, style, scale relationship, viewing direction, scene role, and essential details.
This stage is where vague requests such as “make a giant tiger” become useful decisions. Should the tiger look alert or friendly? Is it one landmark or part of a family group? Which side faces the main audience? Should the colors follow a realistic reference or the event palette? The answers affect every later stage.
The approved image and revision number should be easy to identify. Without one clear reference, workshop photos and later comments can be compared against different versions.
For ParkLightShow projects, review can begin with the site layout or project plan. That early plan gives the buyer a way to confirm the arrangement before the workshop moves into more detailed production references.
2. Proportion, Pose, and Production Layout
The approved visual direction is translated into a layout that can guide fabrication. The design is considered at full display scale rather than only as a small screen image.
Animal forms make this step especially important. A slight change to the head angle, back line, leg position, tail, ear, wing, or facial expression can change the entire character. Details that look clear in a rendering also need to remain readable from the intended viewing distance.
The production layout may also identify planned sections. A large figure cannot be considered only as one finished silhouette; it must also be handled, packed, transported, and reconnected according to the individual project plan.
The module lines are decided against three hard limits. First, the modules must fit inside a standard shipping container with their protective packaging. Second, they must pass through the actual venue gates and along the actual paths from the unloading point to the site; gate widths and the route from the loading area belong in the brief. Third, each joint must be repeatable on site by a local crew with the lifting equipment the venue actually has. Joint lines are usually placed where they are least visible and structurally logical, through the shoulder or torso rather than through the face, and they carry alignment marks so the animal returns to the exact approved form.
The next controlled reference may include what the team calls a structural drawing: a drawing that shows the intended frame form and major sections for that particular lantern. In this article, “structural drawing” describes a project communication record; it does not mean a universal engineering approval or certification.
3. Full-Scale Outline and Frame Shaping
Artisans use the approved layout to establish the full-size outline and shape the internal frame. Curves and major anatomical lines are formed first so the body reads correctly before smaller details are added.
At this stage, visual checks matter. The team can compare the emerging silhouette with the approved reference and review the principal viewing side. A correct component is not enough if the neck, back, legs, or tail do not read as one coherent animal when assembled.
The inner steel frame is the structural core. It carries the lantern’s own weight over a full operating season and transfers external loads, including wind and public contact, down into the base; it also provides the connection points where modules bolt together. A typical frame includes main vertical members carrying the torso, neck and head, a base frame that spreads the load and provides fixing points, bolted joints between modules, bracing where a limb extends away from the body, and dedicated lifting and securing points. The frame is deliberately heavier than the visible surface, because once the lantern is covered it cannot be reached: a surface problem is repairable, a hidden frame problem is not.
Necks, legs, tails, trunks and raised heads need particular care, because a raised limb acts as a lever and multiplies load at the point where it meets the body. The workshop concentrates steel near the limb root rather than the tip, keeps the heaviest components low and close to the center, and balances the pose so the standing legs share the load.
ParkLightShow may share frame-progress photographs at this stage so the customer can compare the developing skeleton with the approved form. The record should identify the figure and revision being shown rather than arriving as an unlabeled workshop image.
This article does not provide frame dimensions, connection details, anchoring methods, or structural criteria. Those decisions depend on the specific display, site, handling plan, and qualified technical review.
4. Section Planning and Trial Assembly
Large animal lanterns may be divided into project-specific sections so they can be handled and packed. Section lines need to respect both the form and the later assembly sequence. A convenient split for transportation may be visually awkward if it cuts through an important facial or surface detail.
A trial fit helps confirm that the major parts align and that the overall silhouette still matches the approved direction. The alignment marks at each joint guide the fit and reveal any section that is not meeting the approved form. The trial also gives the team a clearer basis for labeling sections and preparing the handoff.
For a broader explanation of packing, delivery, and local-team coordination, see the production and installation guidance.
5. Lighting Placement and Visible Light-On Review
Lighting is arranged inside the form so the animal reads as an illuminated sculpture rather than a bright outline with unclear features. The arrangement must work with the body shape, color zones, surface treatment, and planned sections.
Light sources are distributed to produce even brightness through the fabric while avoiding hot spots and dark zones. The torso and limbs use regular spacing for a smooth glow, while the head and face need careful placement around the eyes and muzzle so the features stay readable; long necks and tails need light to reach the tip without visible gaps, and lighter surfaces need fewer sources than dark or dense surfaces. Wiring is routed along the steel frame and secured against movement, and circuits are divided so a single fault does not darken an entire animal.
A visible light-on review can identify uneven-looking areas, details that disappear after dark, or color relationships that differ from the daytime view. This is a visual review, not a substitute for project-specific electrical testing, compliance checks, or site approval.
The display is also designed to be repaired. Access hatches are placed on the back or underside where they do not affect the view, and the most failure-prone components are kept reachable. The factory builds and tests the internal system, while final connection, protective devices and sign-off at the venue must follow local electrical rules and be confirmed by qualified local personnel.
The buyer should ask which drawing version is being reviewed, whether the photograph shows the complete figure or only one section, and whether any visible issue remains open.
In the confirmed ParkLightShow workflow, a light-on video can be shared as a stage record. It helps the customer review the visible nighttime appearance before the project moves forward, while remaining separate from electrical certification or site acceptance.
6. Surface, Color, and Character Details
Before the color work, the wire armature receives its visible skin. Fabric is applied in panels that follow the body rather than in one sheet, with even tension so wrinkles do not break the glow. Seams are placed along natural lines where they disappear against the form, edges and overlaps are sealed against moisture, and high-wear areas near the base and points of public contact receive extra protection. The covering must be tight enough to hold the form while still allowing the lantern to be dismantled and reassembled without tearing.
Once the form and lighting direction are established, the translucent surface and decorative details create the final character. Color zones, markings, eyes, facial features, feathers, scales, fur patterns, or fantasy textures should follow the approved style.
The surface is not merely decoration added after the structure is finished. It affects how the light appears and how the animal is recognized from different distances. A tiger pattern, peacock tail, elephant face, or butterfly wing needs a different balance of large color areas and smaller details.
Buyers should review the whole animal or group, not approve colors one isolated piece at a time. A single element may look attractive by itself but compete with the intended focal figure when the full scene is assembled.
Surface-treatment progress can also be shared for customer review. This gives the buyer a chance to compare the color zones, markings, and visible character with the approved rendering before later work proceeds. Weather and flame-retardant treatment are confirmed for the specific project against the venue’s own requirements rather than assumed to be identical on every site.

7. Pre-Assembly, Labeling, Packing, and Handover
Before packing, the available sections are brought together at full size and lit as one complete animal. This is the most important quality gate in the whole process. A problem found at this stage is a workshop correction made with materials, tools and staff on hand; the same problem found after shipping is a delayed opening, a costly service trip, or a compromise visible to visitors. The full-size display is checked for alignment, stability on its base, even brightness, a sustained lit run, and exact agreement with the approved design.
After review, sections and related components are numbered and labeled according to the project packing and assembly plan. The record should show what was assembled, which design version it represents, and whether any item remains unresolved. Packing records should make it easier for the receiving team to connect a package, label, and component with the correct part of the display, and the module order and electrical connections are documented for the site crew and for later seasons.
Pre-assembly does not prove that every site condition has been resolved. Local ground conditions, access, electrical work, installation methods, approvals, and operating responsibilities remain project- and location-specific.
ParkLightShow can provide stage records for the frame, light-on appearance, assembly, and surface treatment. The customer reviews the current stage before the next stage proceeds. This is a visual and project-communication workflow, not a claim that one approval replaces technical review, local approvals, or final site acceptance.
Lantern vs. Fiberglass Sculpture: Two Different Builds
Buyers sometimes compare animal lanterns with animal sculptures made of fiberglass, and the two are genuinely different products.
A giant lantern is built from an internal steel frame with a hand-shaped wire armature and a translucent fabric surface that glows from within. It is engineered as transportable modules and is designed first for illumination, which is why custom species and one-off poses are practical. A fiberglass sculpture is formed with resin and glass fiber over a mold, producing a hard, durable, painted surface that is usually chosen for daytime appearance and physical contact.
Many attractions use both rather than choosing one: fiberglass for daytime scenery and close-touch areas, and lanterns for the illuminated nighttime route. To see how the other method works, read this guide to how fiberglass sculptures are made.
What the Buyer Should Approve at Each Stage
| Stage | Main buyer decision | Useful neutral record |
|---|---|---|
| Concept | Subject, style, scene role, viewing side | Approved brief and reference set |
| Visual design | Proportion, pose, expression, color, quantity | Dated rendering or drawing version |
| Production layout | Full-size silhouette and planned sections | Controlled layout reference |
| Frame shaping | Overall outline against the approved visual | Dated progress photographs |
| Lighting and surface | Visible light distribution, color relationship, key details | Light-on images or video linked to the current version |
| Pre-assembly | Overall form, section alignment, unresolved items | Pre-assembly record and open-item list |
| Packing handover | Component identity and receiving destination | Labels, packing record, and handoff list |
This is a communication framework, not a universal inspection checklist. Technical acceptance criteria, tests, standards, signatures, and release authority must be defined for the specific project by the responsible parties.
Why Animal Lanterns Need More Design Decisions Than a Simple Shape
An animal is recognized through relationships: the head compared with the body, the legs compared with the torso, the direction of the eyes, the line of the back, the tail, and the pose. That means a buyer can approve the species but still be dissatisfied if the character and posture were never clearly defined.
Realistic or Stylized
A realistic direction depends on coherent proportions and recognizable markings. A stylized direction may simplify shapes, enlarge the head, soften the expression, or use fantasy color. Either can work, but changing between them after fabrication begins can affect many connected parts.
One Landmark or a Group
A single giant lantern needs a strong silhouette and a clear focal angle. A group needs relationships: adults and young animals, repeated poses or varied poses, consistent colors, and enough difference to avoid looking mechanically duplicated.

Unique Forms or Repeated Forms
Repeating one approved animal form can create rhythm and simplify the visual system. Unique poses can make a scene richer but require more individual design decisions. Buyers should decide where repetition is useful and where a one-off figure carries the identity of the project.
Animal and Environment
Plant forms, rocks, waves, coral, mushrooms, or scenic bases can connect an animal to a larger theme. They should be planned with the animal rather than added as unrelated fillers at the end. The background supports the main silhouette; it should not make every area equally busy.
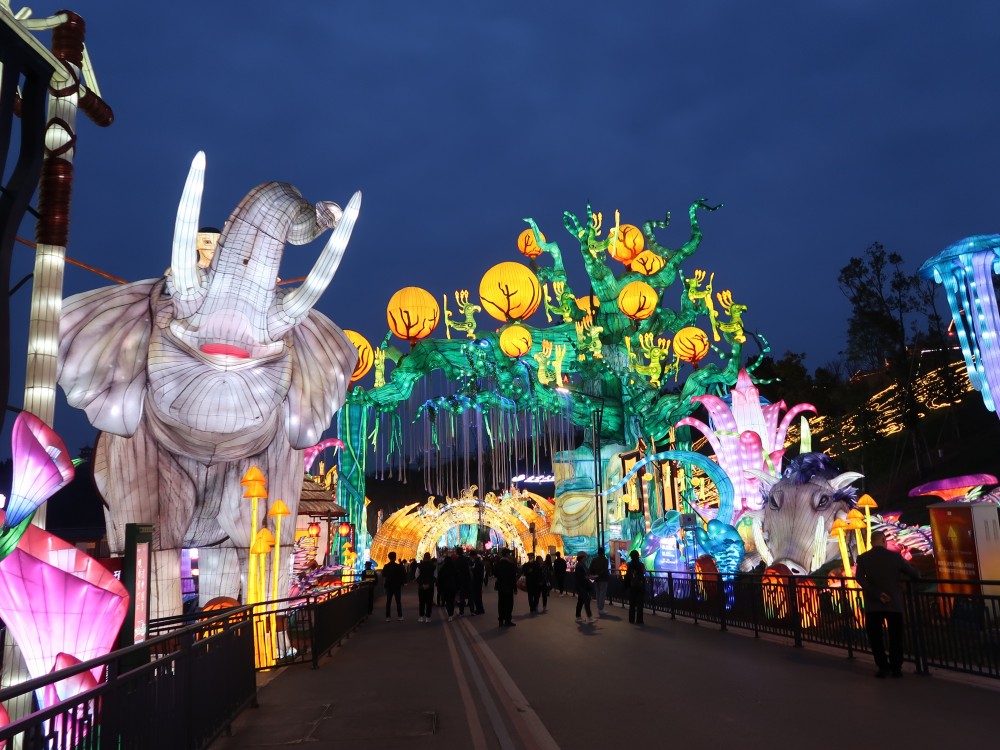
From Factory to Site: Dismantle, Pack, Ship, and Reassemble
After the full-size approval, the lantern is dismantled along the module lines, protected and packed for export. Each module is packed with its number and position visible, and the packing order is planned so the modules needed first at the venue are accessible first. Documentation, packing lists and electrical records accompany the shipment. On site, the local crew reassembles the modules in the recorded order, fixes the base, reconnects the circuits and runs a full night test before the public opening.
The logistics stage has its own responsibilities, from container planning and customs to delivery windows and local crew coordination, and they are covered in the international logistics, installation and after-sales support guidance. Lanterns are commonly designed for reuse across seasons when that is the goal; the storage and refurbishment choices for a second season are explained in this refresh guide for a returning lantern festival.
Evidence a Buyer Can Request Before Packing
A buyer does not need to manage the workshop to maintain a clear project record. A small set of version-controlled evidence is more useful than a large folder of unlabeled images.
Consider requesting:
- the approved visual reference and current revision identifier;
- progress images that clearly name the animal or display group;
- a view of the full silhouette or the largest available assembly;
- light-on images or video showing the visible color relationship;
- a list of unresolved visual items and their responsible reviewer;
- section and package labels that correspond to the handoff list;
- a record of what was not included in the factory review and must be confirmed locally.
These records help keep design discussions, factory evidence, and receiving-team questions connected. They do not replace technical documentation, independent inspection, or local professional review when any of those are required.
Frequently Asked Questions
How are giant animal lanterns made?
They usually move from an approved concept to a full-scale production layout, shaped frame, internal lighting, translucent surface and color work, trial assembly, labeling, and packing. The exact sequence and documentation depend on the design, size, project scope, delivery plan, and site requirements.
What must a buyer approve before fabrication?
Approve the reference version, intended viewing side, relative size, proportions, posture, expression, color direction, quantity, group composition, and any essential details. Also identify delivery or handling constraints that may affect how a large figure is divided into sections.
Can the pose and colors be changed?
Custom animal lanterns can be developed around an approved pose and color direction, but changes become more disruptive after related fabrication stages begin. Record the final approved version and confirm which details are fixed before the workshop proceeds.
Why are large animal lanterns divided into sections?
Project-specific sections can support handling, packing, transport, and later assembly. The split also needs to respect the animal’s visible form. Section design, connections, and installation requirements must be determined for the individual project rather than copied from a universal rule.
Can our team inspect the lantern at the pre-assembly stage?
Buyers are commonly invited to inspect at full-size pre-assembly, either in person or through photographs and video calls. This is the most valuable point in the process to confirm the animal because it is fully built, lit, and still correctable. If this matters to your organization, request it before production begins.
Can a giant lantern be reused for more than one season?
Lanterns are commonly designed for reuse when that is the project goal. A reusable display needs joints that repeat, serviceable lighting, careful storage, and a documented refurbishment plan. Those choices should be decided before production rather than improvised after the first season.
How are giant lanterns fixed in place?
Fixing depends on the display, the surface, and the site. The base frame spreads the load and is secured according to the ground type, the height and profile of the animal, and local wind conditions; tall or high-profile animals need more than low displays. The final fixing and any local sign-off are confirmed at the venue rather than applied identically to every site.
How long does production take?
There is no reliable universal duration. Timing depends on design approval, number and complexity of figures, revisions, production scope, evidence review, packing, transport, and project schedule. Request a project-specific timeline with decision dates and dependencies instead of relying on a generic estimate.
What should I send for a custom animal lantern inquiry?
Send the venue type, display-area photographs, approximate available dimensions, main viewing direction, preferred animal and style, reference images, quantity or grouping idea, target opening date, destination, and known delivery or local-assembly constraints. Mark which inputs are confirmed and which remain open.
Turn the Animal Idea Into a Clear Project Brief
The best starting point is not a catalogue number. It is a controlled brief that explains the animal, visual role, scale relationship, pose, color, quantity, scene, and project constraints. For zoos planning a nighttime route, review the zoo lantern festival solutions, and for choosing displays for an outdoor venue, use this guide to selecting Chinese lantern festival displays.
Then review custom animal lanterns for commercial venues, and when the brief is ready, share your site information and preferred animal themes with the HOYECHI team for a buildable design and quotation.
Post time: Aug-30-2026


