
A lantern festival photo spot works best when the visitor is part of the scene from the beginning. A display may look impressive from a distance, yet be difficult to photograph with people if its main features sit far above them, its foreground hides them, or the best view faces away from the path.
For parks, zoos, gardens and event venues, the starting question is simple: where will people stand in relation to the lanterns, and what should be visible around them? The answer shapes the composition before individual colors and decorative details are finalized.
Start with the person, then build the scene
A photo spot can be a visitor standing beside a large animal lantern, a family framed by flowers, or people placed within a walk-through composition. Each creates a different image.
| Visitor position | What the composition needs to show |
|---|---|
| Beside the display | The person and the recognizable lantern shape without one disappearing behind the other |
| In front of the scene | A clear place for people, with the main subject visible above or around them |
| Within a walk-through scene | A defined visitor space and a background that still reads as a complete scene from the intended camera position |
These are visual starting points, not installation instructions. Whether visitors can enter or approach a specific installation must be agreed for the project and checked against the venue’s conditions and operating requirements.
A real butterfly scene in a Spanish park
In one ParkLightShow project in Spain, the client’s park used butterfly and animal lantern forms as part of the display. In the project photograph below, illuminated butterfly outlines flank a path, while smaller butterflies and other figures appear around them. People visible between the larger forms provide a sense of scale. The view illustrates how a main shape, a space for visitors and supporting elements can appear together; it does not establish the dimensions, visitor capacity or safety of another design.
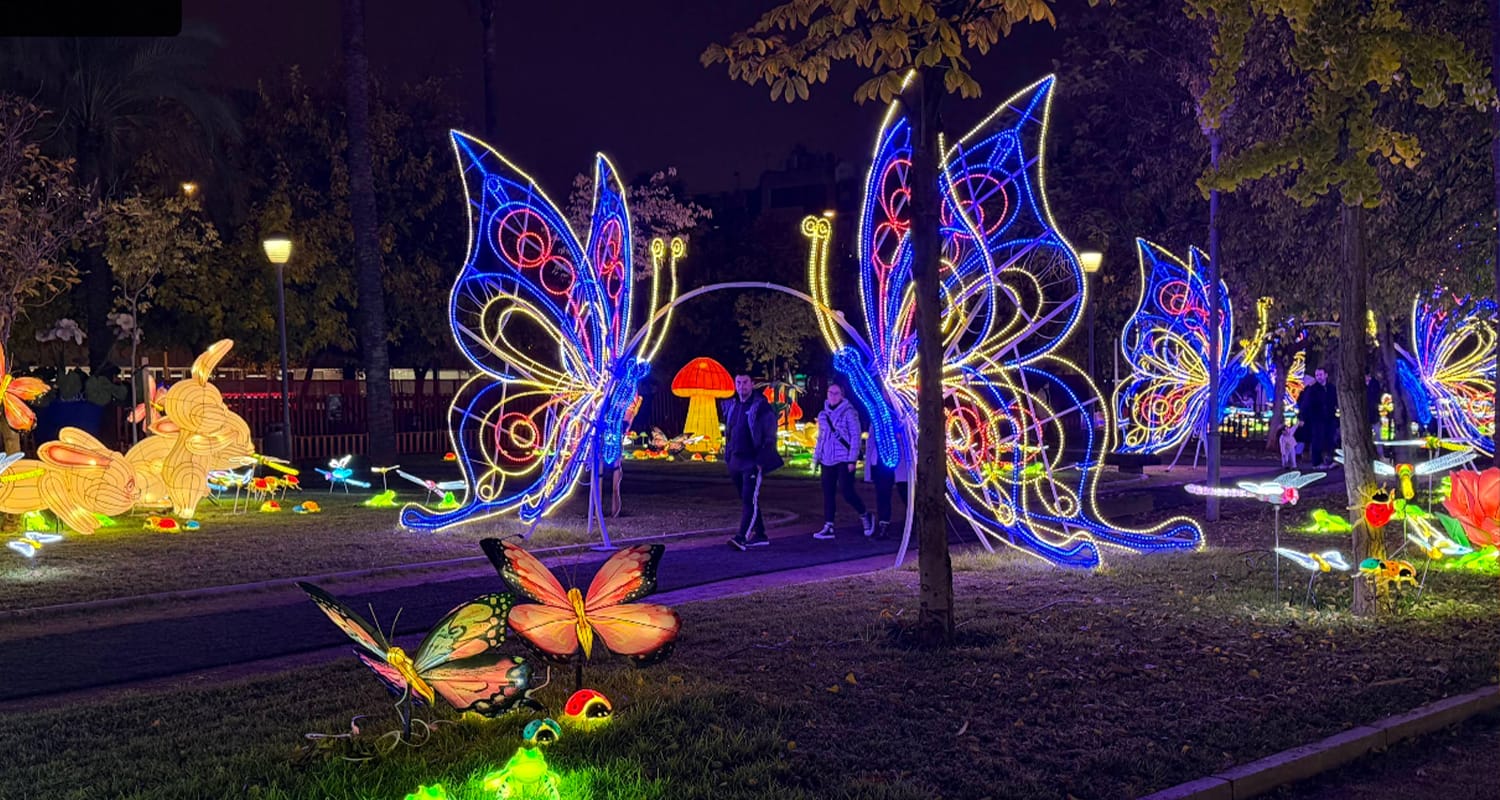
A photograph from the Spain butterfly lantern festival shows illuminated forms arranged around a park path.
Design the main subject for the viewing direction
Look first at how visitors approach the scene. If a lantern’s face, flower head or defining detail turns away from the principal view, the strongest part of the design may be hidden when people arrive.
In our project discussions, the lantern group’s orientation and background are considered in relation to the site. A design can be reviewed from the planned visitor-facing view as well as other important angles. For example, an animal in profile may show its silhouette clearly, while a different pose can make its face more visible from the approach.
Ask for a rendering that includes the surrounding setting and a human-scale reference. Check whether a small group can be seen alongside the subject without covering its defining features. The intended view should be identified on the site plan; one attractive perspective does not guarantee that every viewpoint works equally well.
Use supporting lanterns to frame, not hide
A single focal lantern rarely has to carry the entire story. Flowers, leaves, trees and other related forms can connect the main subject to a broader theme. Our experience with animal and insect displays is that they are often designed as combinations rather than isolated figures.
For a butterfly scene, for instance, a lower flower group might help frame the visitors while leaving the wings and the people visible. For a woodland animal, a tree or plant form could suggest the setting without placing a bright shape directly behind a face in the photo. These are design possibilities, not descriptions of a particular completed project.
Review the foreground and background separately. A rendering may contain many attractive elements, but if every element is the same height or competes for the center, the intended subject can become harder to read. Keep a deliberate opening for people, and check the result again after supporting pieces are added.
Check both the lantern and the people in the image
The display needs to be recognizable, and the visitors need to be visible. Consider the lighting and background together when discussing the design: a brightly lit lantern, a dark visitor position and a cluttered background can produce a very different result from the visual the venue expects.
Ask the design and venue teams to review the scene in its intended setting and, where practical, check the effect on site before opening. Lighting arrangements, electrical work, access and any adjustments must be assessed for the specific project by the responsible venue team and qualified local professionals. A rendering is useful for visual communication; it is not a substitute for that assessment.
Give the designer a useful site brief
Clients do not need a finished creative concept before the first conversation. In many of our projects, the starting materials are a site plan, the venue type, a broad theme, priority areas and an opening date. Daytime photographs of the areas to be arranged help the team understand the setting; an overall nighttime view can provide additional context.
For a particular photo spot, it helps to mark:
- The location on the plan and the direction from which visitors approach.
- The desired relationship between people and the display: beside it, in front of it or within a proposed walk-through scene.
- A reference image and the feature worth keeping, such as a wing shape, animal pose or flower arrangement.
- Existing background elements and any known restrictions the venue wants the designer to consider.
- Whether the scene should work as a standalone focal point or as part of a larger themed group.
The plan and images help start the discussion; measurements, site access, visitor movement, electrical needs and other project conditions still need to be confirmed. In our process, the visual arrangement is revised with the client until the overall design is agreed, before the project moves into the contracted production stage.
Review the photo spot as part of the whole festival
A close-up composition is only one part of a visitor experience. The spot should also make sense within the event’s theme and surrounding lantern festival displays. A garden project might use related flowers and insects across several groups, while an animal-led scene can introduce different poses and supporting vegetation.
Before approving the design, compare the photo view with the site plan and ask the venue team to review visitor standing space and circulation. If the scene changes, update the relevant visual materials so the approved image and the proposed arrangement remain aligned. The broader custom lantern festival design process explains how the venue brief becomes a coordinated visual plan.
Frequently asked questions
Does a photo spot need a walk-through lantern?
No. A visitor can be photographed beside or in front of a display. A walk-through composition is another option, subject to project-specific design and site review.
Should every lantern group be designed for photos?
Not necessarily. A festival can combine major photo scenes with displays meant primarily to be viewed from the route. The right mix depends on the venue, theme and available space.
What if we only have a venue plan and no detailed design?
That is a useful starting point. Share the plan, venue type, approximate theme and daytime photographs, and identify the areas where a photo scene could be considered. The details can be developed and reviewed during design.
To discuss a photo scene or a complete lantern project, contact the ParkLightShow team with your venue information and any visual references you already have.
Post time: Oct-28-2026


